1. Modify the key [HKEY_LOCAL_MACHINE\Drivers\USB\FunctionDrivers\DefaultClientDriver] to RNDIS.
2. Save the registry modifications and restart the module.
3. In Windows, ActiveSync will no longer work and a generic RNDIS device will be listed in Device Manager,under Unknown Devices.
4. Right click the generic device and select to install a driver.
5. In the next window, select “Browse my computer for driver software”:

6. In the next window, select “Let me pick from a list of device drivers on my computer”:

7. In the next window, select Network Adapters from the Common Hardware Types list and click Next.
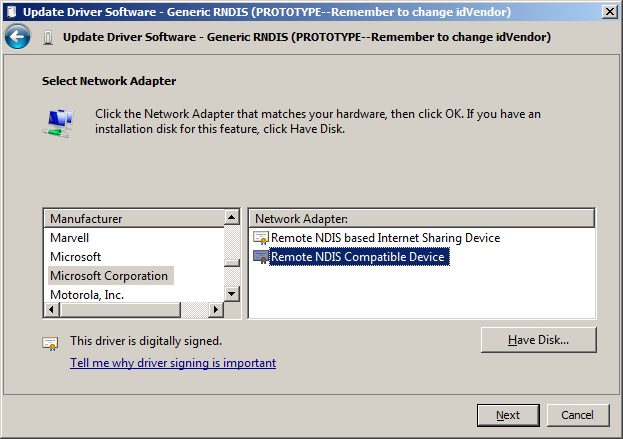
8. In the Select Network Adapter window, select Microsoft Corporation and from the list on the right, Remote NDIS Compliant Device. Click Next.
9. You will get a warning message; you need to ignore it and install the new driver. After installation the RNDIS device will be listed under Network Adapters in Device Manager.
10. On the PC side, in Network Connections, right click on the new adapter and assign it a new IP address, typically: 192.168.55.101 with mask 255.255.255.0. Leave the other fields blank.
11. In Windows CE, open Settings->Network and Dial-Up Connections and double click on the RNDIS adapter. Assign a new IP address, typically 192.168.55.100 with mask 255.255.255.0. Leave the other fields blank.
12. Now test communication between the PC and the Windows CE device by pinging the device’s address.
Important Note: In this setup, Active Sync will no longer work. It can only be restored by modyfing the [HKEY_LOCAL_MACHINE\Drivers\USB\FunctionDrivers\DefaultClientDriver] back to its original value (Serial_Class).
Niciun comentariu:
Trimiteți un comentariu